Keeping your pet clean and well-groomed is more than just an act of love—it’s essential for their health and happiness. Many pet owners, however, find grooming at home a stressful, messy process. The Neakasa Pet Grooming Kit aims to change that, promising a tidy, efficient, and stress-free grooming experience for both you and your furry friend.
But how does it really work, and what should you know before getting started?
In this guide, you’ll discover practical, step-by-step instructions on using the Neakasa Pet Grooming Kit. We’ll cover everything from setup and attachment choices to cleaning and troubleshooting. Whether you have a long-haired cat, a double-coated dog, or a nervous puppy, you’ll learn how to get the best results safely and comfortably.
With clear language, real-world tips, and expert insights, you’ll soon feel confident grooming your pet at home.
What Is The Neakasa Pet Grooming Kit?
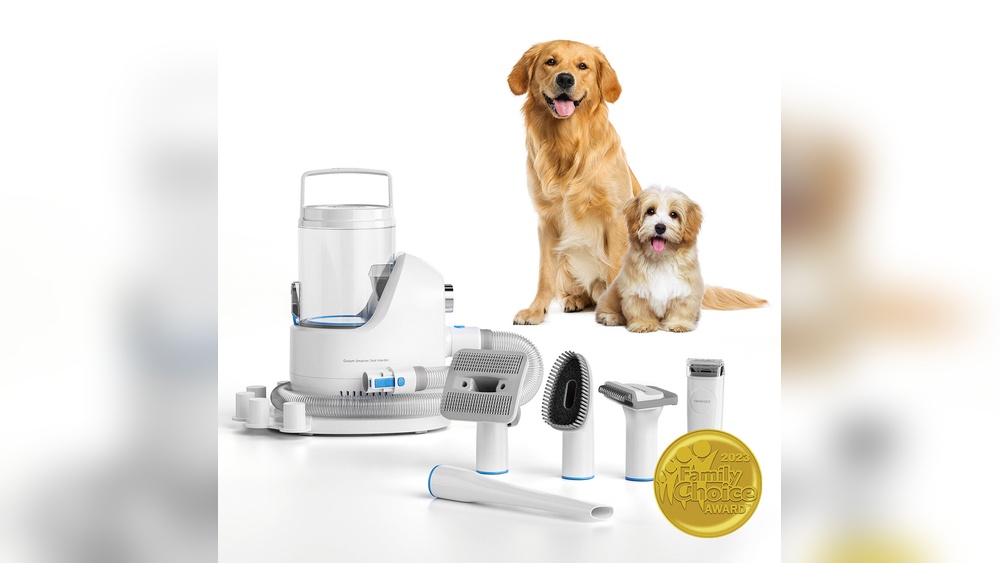
The Neakasa Pet Grooming Kit is an all-in-one grooming solution designed for home use. Unlike regular brushes, it comes with a built-in vacuum system that collects hair and dander as you groom. This means less mess, fewer allergens in the air, and a more comfortable environment for everyone.
The kit usually includes:
- Multiple grooming attachments (such as slicker brush, deshedding tool, and trimmer)
- A vacuum unit with a dustbin
- Various clipper guards for trimming
- A cleaning brush
- Replacement filters
What sets this kit apart is its focus on mess-free grooming and versatility. It’s suitable for dogs and cats of different sizes and coat types. With easy-to-switch attachments, you can brush, trim, and clean without changing tools. The vacuum quietly collects hair, reducing the need for post-grooming cleanup.
Unboxing And Understanding The Components
Before you begin, it’s important to recognize each part of the Neakasa Pet Grooming Kit and know what it’s for. Here’s a breakdown of the main components and their uses:
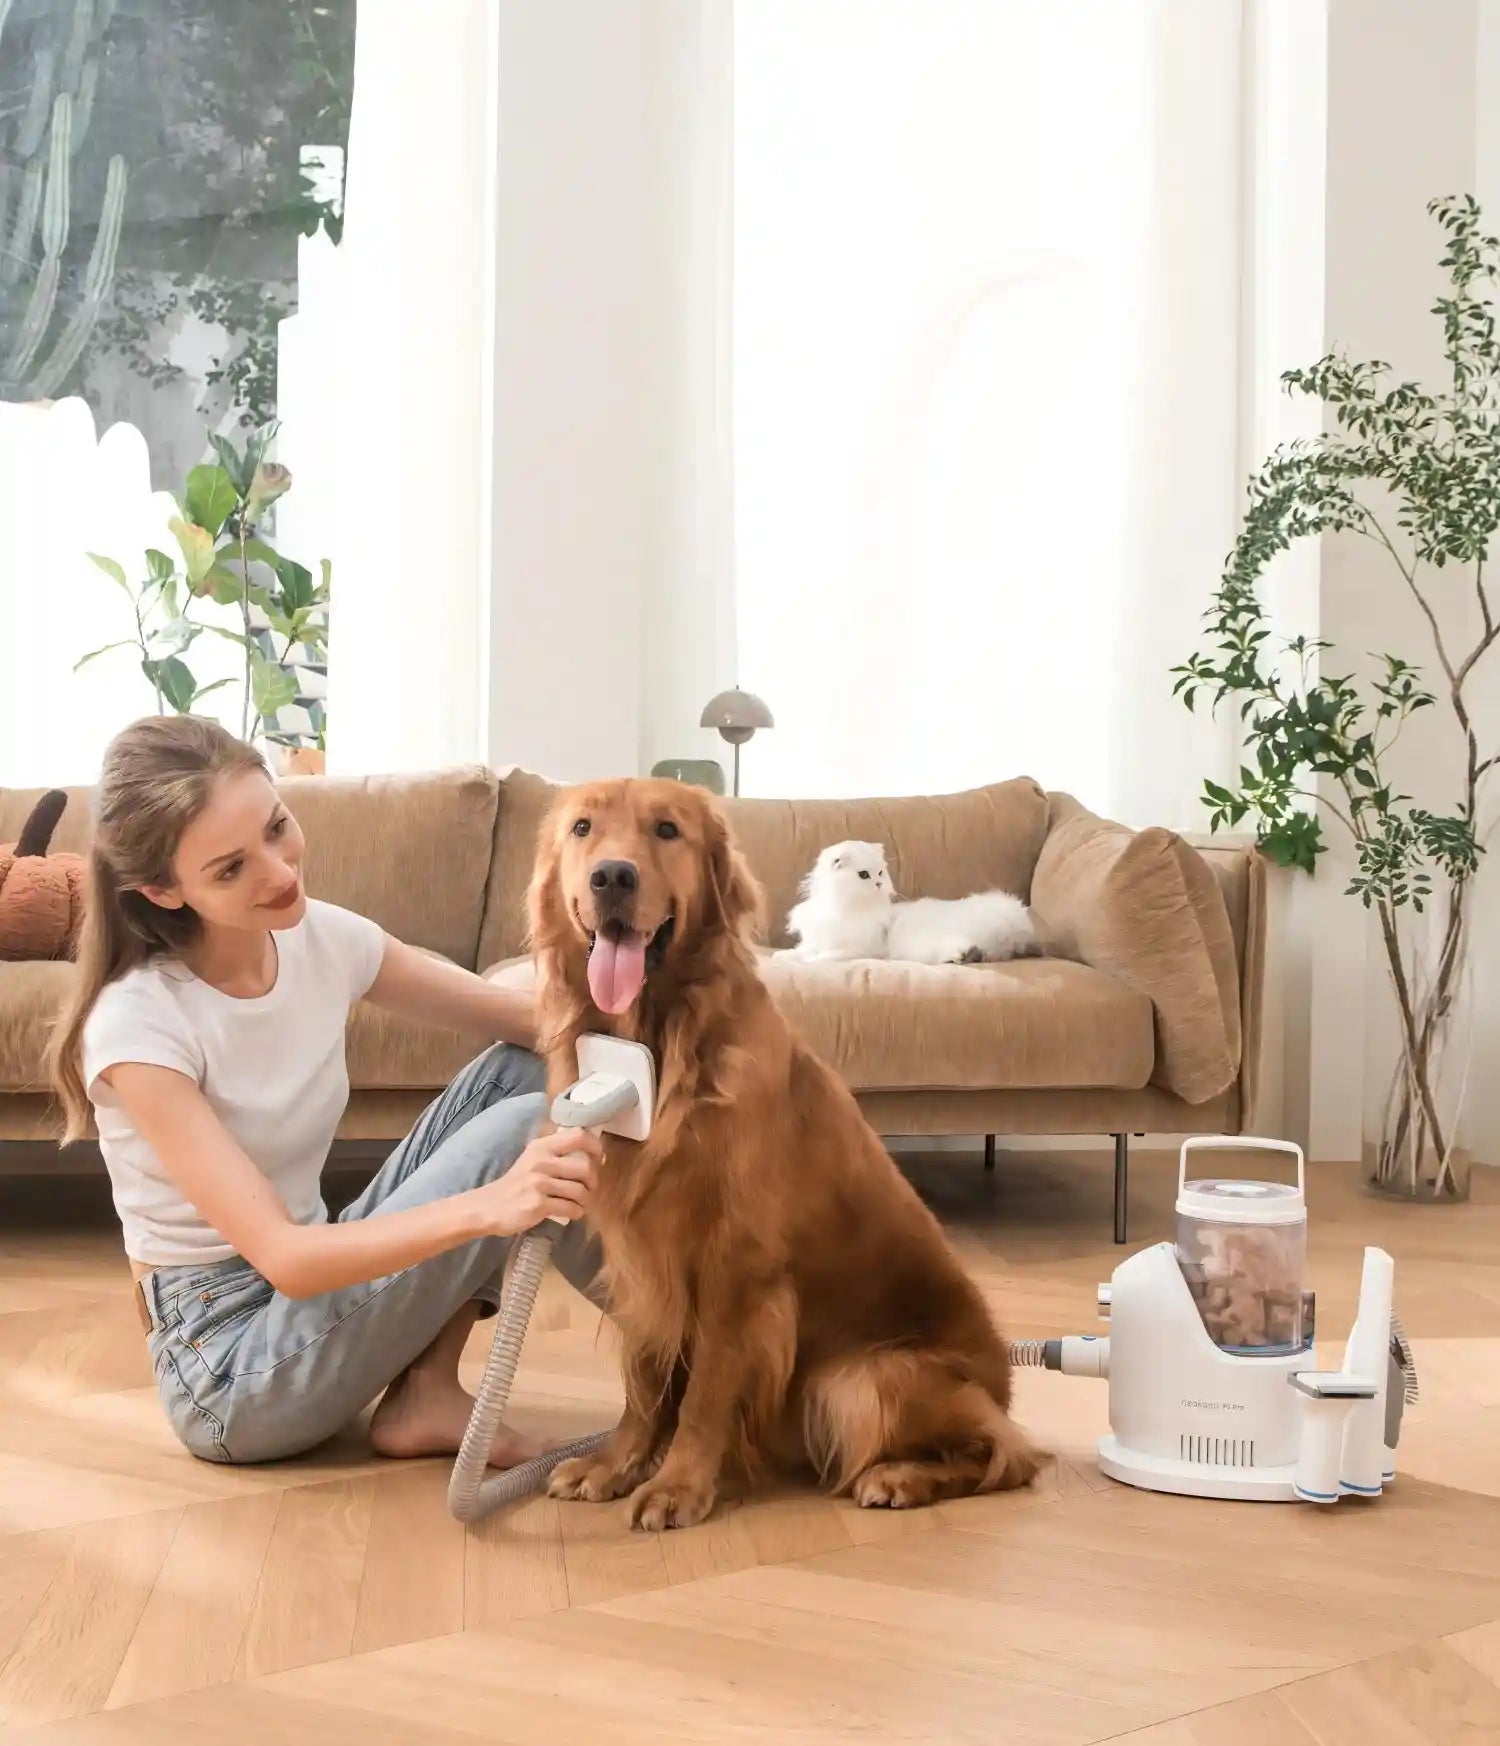
Main Unit (vacuum)
This is the heart of the kit. The vacuum sucks in hair and debris as you groom, storing it in a dustbin. The vacuum is designed to be quiet, making it less likely to scare pets.
Grooming Attachments
- Slicker Brush: Removes loose hair and detangles.
- Deshedding Tool: Targets undercoat, perfect for shedding breeds.
- Grooming Comb: Smooths and finishes after brushing.
- Electric Clipper: For trimming and styling. Comes with multiple guard sizes.
- Cleaning Brush: Cleans surfaces, pet beds, and more.
- Nozzle: For vacuuming tight areas or removing stubborn pet hair from furniture.
Dustbin And Filters
The dustbin collects all hair and dander. The filter ensures that dust and allergens do not return to the air. Clean or replace the filter as recommended.
Clipper Guards
These allow you to trim your pet’s fur to different lengths. They typically range from 3mm to 12mm.
Power Cord And Extension Hose
The extension hose connects attachments to the vacuum, giving you flexibility and reach.
Accessories
Some kits include extra filters, a storage bag, or cleaning oil for the trimmer.
Familiarizing yourself with these parts will make your first grooming session smoother and safer.
Setting Up The Neakasa Pet Grooming Kit
Proper setup is essential for safe and effective grooming. Here’s how to get started:
- Choose a Grooming Area: Select a quiet, comfortable spot. Place a non-slip mat if your pet is nervous or the floor is slippery.
- Plug In the Vacuum: Connect the power cord to a nearby outlet. Avoid using extension cords unless necessary.
- Attach the Hose: Secure the extension hose to the vacuum unit. Make sure it clicks into place.
- Select an Attachment: Pick the right tool for your task (e.g., slicker brush for general brushing).
- Check Dustbin and Filter: Ensure the dustbin is empty and the filter is clean.
- Test the Noise Level: Turn on the vacuum away from your pet so they can hear the sound. Let them sniff and get used to it.
- Prepare Your Pet: Gently introduce the tool to your pet’s body, keeping sessions short at first.
Example Setup Mistake
Many owners forget to check if the dustbin is empty. If the bin is full, suction is weak, and hair may spill out. Always start with an empty bin.
Choosing The Right Attachment For Your Pet
Not all pets need the same grooming approach. Choosing the correct attachment is key to safety and results.
Coat Types And Tools
| Coat Type | Best Attachment | Why |
|---|---|---|
| Short, smooth | Slicker brush | Removes loose hair without scratching skin |
| Long, silky | Grooming comb | Detangles and smooths, prevents matting |
| Double coat (thick undercoat) | Deshedding tool | Reaches undercoat to reduce shedding |
| Curly/wavy | Clipper with guard | Maintains even length, prevents matting |
| Wire-haired | Slicker brush & clipper | Removes tangles, trims wiry hair |
Attachment Tips
- Start with the slicker brush for general cleaning.
- Use the deshedding tool during heavy shedding seasons (spring/fall).
- For trims, choose a clipper guard that matches your pet’s breed standard or your preference.

Credit: www.walmart.com
Step-by-step Guide: Grooming With The Neakasa Kit
Getting the best results with the Neakasa Pet Grooming Kit is all about technique and patience. Here’s a detailed walkthrough:
1. Brushing And Detangling
- Start Slow: Let your pet sniff the brush and hear the vacuum.
- Turn On Low Suction: Begin with the lowest setting to avoid startling your pet.
- Brush with the Grain: Move the brush in the direction of hair growth. Short, gentle strokes are best.
- Watch for Tangles: If you find mats, stop and gently tease them out. Never pull hard.
- Empty the Dustbin as Needed: If you’re grooming a shedding dog, check the dustbin halfway through.
2. Deshedding
- Switch to the Deshedding Tool: Attach it firmly to the hose.
- Focus on Dense Areas: Target the back, neck, and thighs—common places for undercoat buildup.
- Short, Overlapping Strokes: Do not press hard. Let the tool do the work.
- Check for Skin Redness: If you see pink or irritated skin, stop and switch to a softer brush.
3. Trimming And Clipping
- Choose the Right Guard: Select a length that matches your pet’s needs (e.g., 6mm for summer cuts).
- Comb Out Tangles First: Never trim tangled fur; it can jam the clippers.
- Clip Slowly: Move in the direction of hair growth. Start from the neck, moving toward the tail.
- Keep Clipper Blades Cool: Check blade temperature every few minutes. Pause if it feels hot.
- Vacuum as You Trim: The kit collects cut hair instantly, preventing mess.
4. Cleaning Paws, Tails, And Sensitive Areas
- Use Lower Suction: Sensitive spots need gentle handling.
- Hold the Paw or Tail Steady: Prevents accidental nicks.
- Switch to the Grooming Comb: For legs, tails, and faces, the comb is safer and less stressful.
5. Finishing Touches
- Wipe Eyes and Ears: Use a damp cloth. Never insert the tool into ears.
- Reward Your Pet: Offer treats and praise for a calm session.
- Clean the Attachments: Remove hair and wipe tools before storing.
Cleaning And Maintaining The Neakasa Kit
Proper maintenance extends the life of your grooming kit and keeps it working efficiently. Here’s what to do after each session:
Dustbin And Filter Cleaning
- Empty the Dustbin: After every grooming, remove and empty the bin. Tap out any stuck hair.
- Clean the Filter: Rinse the filter under cold water once a week. Allow it to dry completely before replacing.
- Check for Blockages: If suction drops, inspect the hose and attachment for clogs.
Attachment Care
- Remove Hair from Brushes: Use the cleaning brush or your fingers.
- Wash Removable Parts: Some attachments can be rinsed with water. Check the manual.
- Oil the Clipper Blades: A drop of clipper oil keeps blades sharp and prevents rust.
Storage Tips
- Store the kit in a dry, cool place.
- Keep attachments organized in the storage bag.
- Avoid coiling the hose too tightly, which can cause cracks.
Comparing The Neakasa Kit To Traditional Grooming Tools
Many pet owners wonder if the investment in a kit like Neakasa is worth it compared to regular brushes and clippers. Here’s a comparison:
| Feature | Neakasa Kit | Traditional Tools |
|---|---|---|
| Mess Control | Excellent (hair is vacuumed) | Poor (hair scatters everywhere) |
| Time Required | Shorter (all-in-one steps) | Longer (separate cleanup needed) |
| Pet Comfort | Quieter, less stressful | Can be noisy or uncomfortable |
| Allergen Control | Reduces airborne dander | Dander often spreads |
| Cost Over Time | Higher upfront, lower maintenance | Lower upfront, higher maintenance |
Insight: Traditional tools may seem cheaper, but the Neakasa Kit saves time and cleaning effort, especially for pets that shed heavily or have thick coats.
Safety Tips For Using The Neakasa Pet Grooming Kit
Keeping your pet safe is the top priority. Here are important safety tips:
- Never Leave the Kit Unattended: Curious pets can chew cords or attachments.
- Test on Yourself First: Feel the brush or trimmer on your skin to check for sharpness or heat.
- Check Skin for Cuts or Rashes: Avoid grooming over wounds.
- Start with Short Sessions: 5-10 minutes is enough for the first few uses.
- Monitor for Stress: Signs of anxiety include trembling, hiding, or vocalizing. Stop and try again later.
- Keep Children Away: The kit is not a toy and contains small parts.
Non-obvious insight: Many pets react to the *vibration* of the trimmer more than the noise. Try running the trimmer near your pet’s body (without touching) before actual use. This can desensitize nervous animals.

Credit: www.amazon.com
Troubleshooting Common Problems
Even with a premium kit like Neakasa, you may face issues. Here’s how to address them:
Poor Suction
- Check for Blockages: Hair can clog the hose or brush.
- Empty Dustbin: A full bin restricts airflow.
- Clean or Replace Filter: Dirty filters reduce suction.
Attachments Not Fitting
- Align and Push Firmly: Attachments need to click into place.
- Check for Debris: Hair can block connection points.
Trimmer Not Cutting Well
- Clean and Oil Blades: Built-up hair or dry blades reduce effectiveness.
- Replace Blade if Needed: Dull blades pull hair instead of cutting.
Pet Scared Of Noise
- Use Gradual Introduction: Let your pet hear the vacuum while offering treats.
- Try Lower Suction: Some kits have quieter settings.
Hair Escaping The Vacuum
- Slow Your Movements: Fast brushing can overwhelm the vacuum.
- Check for Leaks: Ensure attachments and hose are securely connected.
Expert tip: If you notice static electricity (hair sticking to your pet or the tool), lightly dampen your hands or the brush. This reduces static and improves hair collection.
How Often Should You Groom With Neakasa?
The ideal grooming schedule depends on your pet’s breed, coat type, and shedding patterns:
- Short-haired breeds: Once every 1-2 weeks.
- Long-haired breeds: Once or twice a week.
- Heavy shedders: 2-3 times a week during shedding seasons.
- Curly or thick-coated breeds: Weekly brushing; trimming every 4-8 weeks.
Cats generally need less frequent grooming, but long-haired cats may benefit from weekly sessions.
Non-obvious insight: Regular, gentle grooming can help you spot skin problems, ticks, or injuries early—potentially saving on vet bills.
Making Grooming A Positive Experience
A calm, happy pet is easier to groom. Here are ways to make the process smooth:
- Associate Tools with Treats: Offer high-value treats or toys during grooming.
- Start with Short Sessions: Gradually increase time as your pet becomes more comfortable.
- Talk Softly: Use a gentle voice to reassure your pet.
- Stick to a Routine: Groom at the same time and place to build trust.
- Let Your Pet Take Breaks: If they get restless, pause and try again later.
Advanced Uses: Creative Grooming And Styling
If you’re comfortable with basic grooming, the Neakasa Kit can help you get creative:
- Pattern Trims: Use different clipper guards to shape fur (e.g., teddy bear cut for Poodles).
- Blending Techniques: Switch between guards for a natural look.
- Sanitary Trims: Carefully trim around paws, belly, and rear for hygiene.
- Face and Ear Trimming: Use the smallest guard and go slowly.
Always prioritize safety over style. If unsure, consult a professional groomer before attempting complex trims.
Cost Savings And Long-term Value
Professional grooming can be expensive, especially for large or high-maintenance breeds. Here’s an example of potential savings:
- Average professional grooming cost: $50–$90 per session
- Neakasa Kit cost: $120–$180 (one-time)
- Grooming frequency: 12 times per year
Yearly savings: If you groom at home, you save $480–$900 annually after the kit pays for itself.
Data point: According to the American Pet Products Association, US pet owners spend over $5 billion each year on grooming and boarding. Home grooming can significantly cut this cost.
Real-world User Experiences
Many users share positive stories about the Neakasa Kit’s impact:
- Less Mess: Owners of Golden Retrievers and Huskies report far less hair on furniture and clothes.
- Easier for Nervous Pets: Cats and small dogs, which fear clippers, often tolerate the quieter Neakasa vacuum.
- Better for Allergy Sufferers: Families notice less sneezing and itching thanks to improved dander control.
- Faster Cleanup: Parents with busy schedules appreciate the one-step cleanup.
Of course, no product is perfect. Some users note that very large or heavy-coated breeds may fill the dustbin quickly, needing mid-session emptying.
When To Seek Professional Help
While the Neakasa Kit works well for most pets, there are times when professional grooming is best:
- Severe Mats: Deep tangles near the skin can cause pain or injury if removed incorrectly.
- Aggressive or Highly Anxious Pets: For safety, let experts handle them.
- Show Grooming: If your pet competes, breed-standard cuts may require advanced skills.
- Medical Issues: Skin infections, wounds, or allergies need a vet’s care.
If you’re unsure, ask your veterinarian or a certified groomer for advice.
Environmental And Health Benefits
Grooming at home with a vacuum-based kit offers extra perks:
- Reduces Hair in Drains and Landfills: Less fur goes down the drain or into the trash.
- Improves Indoor Air Quality: By capturing dander and dust, the kit benefits allergy sufferers.
- Limits Use of Harsh Chemicals: Regular brushing means you can bathe your pet less often, reducing shampoo and water use.
Tip: Clean your kit regularly to keep suction strong and air fresh.
Comparing Neakasa With Competing Grooming Kits
How Does Neakasa Stack Up Against Other Home Grooming Solutions?
| Brand | Noise Level | Attachment Variety | Dustbin Size | Price Range |
|---|---|---|---|---|
| Neakasa | Low | 5-6 | 1.0L | $120–$180 |
| Dyson Groom Tool | Medium | 2-3 | 0.5L | $80–$120 |
| Oneisall Pet Kit | Low | 5 | 1.2L | $100–$160 |
| Bissell Pet Hair Eraser | Medium | 3 | 0.7L | $90–$140 |
Neakasa stands out for quiet operation and a range of attachments, making it a flexible choice for multi-pet homes.
Getting The Most From Your Investment
To make the Neakasa Kit last:
- Follow the Manual: Each model has slightly different maintenance needs.
- Replace Filters on Time: This keeps suction strong and prevents overheating.
- Oil Blades Regularly: Prevents rust and prolongs trimmer life.
- Store Properly: Avoid damp, dusty places.
Bonus insight: Register your product on the official Neakasa website for warranty support and replacement parts.
Credit: neakasa.com
Frequently Asked Questions
How Do I Clean The Neakasa Pet Grooming Kit Filter?
Remove the filter from the dustbin, tap off loose hair, and rinse under cold water. Let it air dry fully before putting it back. Never use a wet filter in the vacuum.
Can The Neakasa Kit Be Used On Cats As Well As Dogs?
Yes, the Neakasa Kit is designed for both cats and dogs. For cats, use the lowest vacuum setting and start with the slicker brush or grooming comb. Always supervise and keep sessions short for nervous pets.
What Should I Do If My Pet Is Afraid Of The Vacuum Noise?
Introduce the vacuum slowly—let your pet investigate while it’s off, then turn it on away from them. Use treats and praise. Over a few days, bring the tool closer while rewarding calm behavior.
How Often Should I Replace The Filter And Blades?
Replace the filter every 2–3 months for heavy use, or as soon as suction drops. Oil the blades after each use and replace if they feel dull or pull hair instead of cutting.
Where Can I Find More Information Or Support For My Neakasa Kit?
Visit the official Neakasa website or see trusted sources such as American Kennel Club for grooming guides and troubleshooting help.
Grooming your pet at home can be rewarding, cost-effective, and even fun with the right tools and approach. The Neakasa Pet Grooming Kit, when used properly, offers a cleaner, happier, and healthier life for both you and your four-legged family member.
With each session, you’ll grow more skilled and confident, building trust with your pet and transforming grooming from a chore into a bonding experience.