
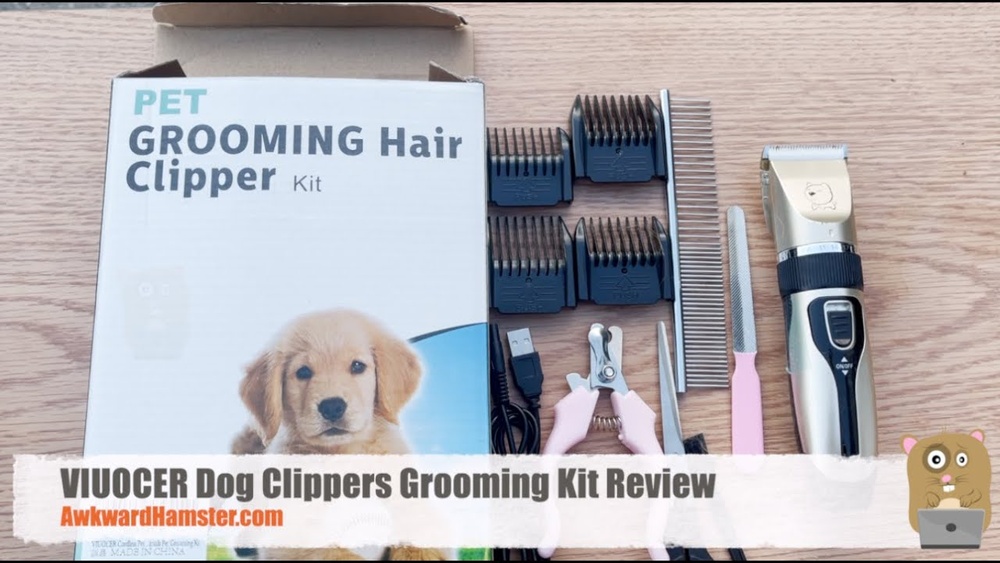
Grooming your pet at home is easier than ever with the right tools, and a pet grooming hair clipper kit can be your best friend in this process. Many pet owners worry about taking their dogs or cats to professional salons—whether it’s because of cost, stress for their animal, or simply the convenience of home care. Using a grooming clipper kit can help you keep your pet comfortable, tidy, and healthy, all without leaving your house. In this guide, you’ll discover how to use a pet grooming hair clipper kit with confidence, even if you’re a total beginner. We’ll cover everything from setting up your kit, understanding the different attachments, step-by-step grooming, maintenance, safety, and useful tips that most beginners miss. By the end, you’ll feel ready to give your pet a calm, safe, and effective grooming experience.
Understanding Your Pet Grooming Hair Clipper Kit
Before you start, it’s important to know what comes in a typical pet grooming hair clipper kit. Each part has a specific purpose, and using the right attachment will make grooming much smoother and safer for your pet.
| Kit Component | Purpose |
|---|---|
| Clippers | The main tool for cutting fur |
| Guide combs/guards | Control the length of hair left after trimming |
| Scissors | Trim delicate areas or finish the cut |
| Thinning shears | Reduce bulk in thick coats for a natural look |
| Comb & brush | Untangle and smooth fur before clipping |
| Blade oil & cleaning brush | Maintain and clean the clipper blades |
| Nail clippers | Trim your pet’s nails (included in some kits) |
| Instruction manual | Guides you on using and maintaining the kit |
Not every kit is the same. Some include special attachments for sensitive areas, or extra blades for different coat types. Always check your kit’s contents and read the manual before you begin.
Types Of Clippers: Corded Vs Cordless
Another key factor is whether your clipper is corded or cordless. Corded clippers usually offer more power and don’t run out of battery, making them suitable for large pets or thick coats. Cordless clippers are more flexible and easier to use around fidgety pets or in tight spaces, but you’ll need to keep them charged.
| Type | Pros | Cons |
|---|---|---|
| Corded | Consistent power, no charging needed | Less portable, cord can tangle |
| Cordless | Easy movement, good for nervous pets | Limited battery life, can lose power during use |
Choosing the right type depends on your pet’s size, coat thickness, and your own comfort.
Preparing Your Pet And Workspace
A calm, well-prepared environment is essential for a successful grooming session. Pets can sense tension, and a stressful setup can make grooming difficult or even dangerous.
Setting Up The Grooming Area
Choose a space that’s quiet, well-lit, and easy to clean. Lay down a non-slip mat on a sturdy table or counter. This keeps your pet from slipping and helps them feel secure. If your pet is large, the floor with a towel or blanket may be better.
Keep all your tools within easy reach. Have a trash bag or dustpan nearby for fur cleanup. Some owners use treats to create a positive association with the grooming area.
Preparing Your Pet
- Exercise: Let your pet burn off energy with a walk or play session before grooming.
- Brush out tangles: Use a comb or brush to remove mats and loose hair. Clippers can’t cut through mats, and pulling can hurt your pet.
- Check for skin issues: Look for cuts, bumps, ticks, or sore spots. Avoid these areas during clipping.
- Clean and dry fur: Bathe your pet if needed, then dry completely. Wet fur clogs clippers and makes cutting uneven.
A little preparation goes a long way to keep your pet safe and happy during grooming.
Understanding Guide Combs And Blade Lengths
Guide combs are the plastic attachments that snap onto your clipper’s blade. They control how much hair is left after cutting, so you can choose the right length for your pet’s breed or style.
| Comb Size | Resulting Hair Length | Best For |
|---|---|---|
| 1/8″ (3mm) | Very short cut | Summer trims, hygiene areas |
| 1/4″ (6mm) | Short but not shaved | Body trims, most short-haired breeds |
| 1/2″ (13mm) | Medium cut | Fluffy look, double coats |
| 1″ (25mm) | Longer cut | Long-haired breeds, winter cuts |
Pro tip: Start with a longer guard if you’re unsure. You can always cut shorter, but you can’t put hair back!
Step-by-step: How To Use A Pet Grooming Hair Clipper Kit
Many owners worry about hurting their pet or making a mistake. Follow these steps to make the process smooth and safe, even if you have never used clippers before.
Step 1: Get Your Pet Comfortable
Start by letting your pet sniff and see the clippers before turning them on. Give a treat and speak in a calm voice. If your pet is nervous about the sound, turn the clippers on and off a few times, giving treats each time so they link the noise with something positive.
Step 2: Detangle And Brush
Use a comb or slicker brush to remove any mats or tangles. Mats can jam the clippers and hurt your pet. Pay extra attention behind the ears, under the legs, and around the tail—these are common problem spots.
Step 3: Choose And Attach The Right Comb
Snap the guide comb that matches your desired fur length onto the clipper. Make sure it is secure to avoid uneven cutting or injury.
Step 4: Start Clipping
Hold the clippers with a steady grip, but don’t squeeze too tightly. Move in the direction of hair growth, not against it—this is more comfortable for your pet and gives a smoother look.
Begin at the neck or shoulders and work your way down the body, using slow, gentle strokes. Don’t rush. Check the blade’s temperature often; blades can get hot and burn your pet’s skin. If the blade feels warm, switch it out or let it cool.
Step 5: Trim Sensitive Areas
For the face, paws, belly, and around the tail, use a shorter guard or the scissors included in your kit. Work slowly and carefully, as these areas are more sensitive and prone to nicks.
Never use clippers near the eyes, genitals, or inside the ears. Use scissors or a special trimmer instead, and only if your pet is calm.
Step 6: Check Your Work
Run your hands over your pet to feel for missed spots or uneven areas. Use scissors or the clippers without a guard for touch-ups, if needed.
Step 7: Reward Your Pet
Give lots of praise, pets, and a favorite treat. This helps your pet develop a positive association with grooming time.
Grooming Different Breeds And Coat Types
Not all pets have the same fur. Understanding your pet’s coat is key to choosing the right tools and techniques.
Short-haired Breeds
Short-haired dogs (like Beagles or Boxers) and cats need minimal trimming. Use a medium or long guard just to tidy up, especially around the belly, paws, and tail. Avoid shaving too close—short hair offers natural skin protection.
Long-haired Breeds
Shih Tzus, Maltese, and similar breeds benefit from longer guards and more frequent brushing. Divide the grooming into sections (head, body, legs, tail) to avoid missing spots. Thinning shears help blend the cut for a natural finish.
Double-coated Breeds
Breeds like Golden Retrievers and Huskies have a dense undercoat. Avoid shaving double coats unless there’s a medical reason; it can harm their natural insulation and skin. Use the clippers just for trimming around the paws, hygiene areas, and for minor touch-ups.
Curly And Wavy Coats
Poodles, Bichon Frises, and other curly-coated breeds often need regular clipping. Their fur can mat easily. Use a steel comb and slicker brush before and after clipping. Curly fur can hide skin folds and bumps, so check carefully as you go.
Cats
Many cats tolerate grooming if introduced slowly. Use the quietest clippers you can find and work in short sessions. For long-haired cats, focus on the belly and behind the legs, where mats form easily.
Insider tip: Most beginners miss that some breeds have very thin or sensitive skin. Always go slow near elbows, armpits, and bellies.
Common Mistakes And How To Avoid Them
Every pet owner makes mistakes at first. Here’s how to avoid the most common problems:
- Not brushing before clipping: Clippers cannot cut through mats. Always brush out tangles first.
- Choosing the wrong guard: Start with a longer guard if you’re unsure. You can always cut more off.
- Going too fast: Quick movements can startle your pet or cause uneven cuts.
- Forgetting to check blade temperature: Hot blades can burn your pet. Check often, especially during long sessions.
- Ignoring your pet’s mood: If your pet is stressed, take a break. Forcing grooming can create fear and make future sessions harder.
- Skipping maintenance: Dirty or dull blades pull hair and make grooming uncomfortable. Clean and oil your clippers after every use.
Unexpected insight: Many beginners overlook how much fur is removed during a session. Have a vacuum or broom ready—pet hair can get everywhere!
Cleaning And Maintaining Your Clipper Kit
Proper maintenance is not just about keeping your kit working; it keeps your pet safe and comfortable. Dull or dirty blades can tug at fur, cause uneven cuts, or even injure your pet.
After Each Use
- Remove the blade (if possible) and brush off all fur with the cleaning brush included.
- Oil the blade using a few drops of clipper oil. This reduces friction and extends blade life.
- Wipe down the body of the clippers with a dry or slightly damp cloth. Never submerge in water.
- Store safely in a dry place, away from moisture and dust.
Deep Cleaning
Every few uses, do a deeper clean:
- Remove the blade and soak it in blade wash or rubbing alcohol for a few minutes.
- Use a soft brush to scrub away any stuck hair or debris.
- Dry thoroughly before reattaching.
Battery Care For Cordless Clippers
If your kit is cordless, keep the battery healthy by charging after each use, but avoid overcharging. Store the clipper with a partial charge if you won’t use it for a while.
Pro tip: Replace blades or batteries as soon as you notice reduced performance. Dull blades are a common cause of poor grooming results.
Safety Tips For Using Pet Grooming Clippers
Safety should always come first—for both you and your pet. Clippers are powerful tools, and a few simple precautions can prevent accidents.
- Never leave clippers unattended around pets or children.
- Check for hot blades frequently. If the blade is uncomfortable to touch, it’s too hot for your pet.
- Keep blades sharp and clean to avoid pulling fur or causing injury.
- Always use guards for beginners. Guards add a safety buffer between the blade and your pet’s skin.
- Keep your pet restrained, but never use force. A calm voice and gentle touch are best.
- Trim nails carefully, if your kit includes nail clippers. Take just the tip to avoid hitting the quick (the sensitive part inside the nail).
- Use scissors only for finishing or on areas where clippers can’t reach.
If you’re ever in doubt, stop and check your manual or call your veterinarian for advice.

Credit: www.ebay.com
Troubleshooting: What To Do If Something Goes Wrong
Even experienced groomers sometimes run into problems. Here’s what to do if you encounter common issues:
Clippers Won’t Start Or Stop Mid-use
- Check that the power switch is on.
- For corded models, make sure the outlet is working and the cord is not damaged.
- For cordless models, recharge the battery.
Clippers Are Pulling Or Tugging Fur
- Clean and oil the blades—dirt and hair can cause pulling.
- Replace dull blades.
- Try using a different guard or moving more slowly.
Uneven Or Choppy Cuts
- Go over the area again with slow, even strokes.
- Brush the fur again and try another pass.
- Check that the guide comb is attached correctly.
Your Pet Is Stressed Or Moving Too Much
- Take a break and offer treats or a favorite toy.
- Try grooming in shorter sessions.
- Ask a friend or family member to gently hold your pet.
Accidentally Nicked The Skin
- Apply gentle pressure with a clean cloth to stop bleeding.
- Clean with pet-safe antiseptic.
- If the cut is deep or won’t stop bleeding, call your vet.
Unexpected insight: Sometimes, static electricity from dry fur can cause “clipper bites” (tiny red spots). Lightly misting your pet’s coat with water before grooming can reduce this.
When To Seek Professional Help
Home grooming is a great way to bond with your pet and save money, but it’s not always the best option. Sometimes, a professional groomer or veterinarian is the safest choice.
Consider calling a pro if:
- Your pet is extremely anxious or aggressive.
- The fur is severely matted or tangled.
- Your pet has skin conditions, wounds, or parasites.
- You want a complex breed-specific cut.
- You’re not confident using sharp tools near sensitive areas.
A professional can handle tricky situations safely and may offer tips to make home grooming easier next time. For more information on pet grooming safety and professional services, see the American Veterinary Medical Association: AVMA Pet Grooming Guidelines.

Credit: www.streetphotographersfoundation.com
Tips For A Positive Grooming Experience
Grooming can be a bonding time for you and your pet if you approach it with patience and care.
- Start early: If possible, begin grooming your pet as a puppy or kitten. Early exposure reduces fear.
- Keep sessions short: Especially for beginners or nervous pets. Multiple short sessions are better than one long, stressful one.
- Use positive reinforcement: Treats, praise, and gentle handling make a big difference.
- Stay calm: Your pet will pick up on your mood. If you’re relaxed, they’re more likely to be as well.
- Set a regular schedule: Consistency helps your pet know what to expect, reducing anxiety.
Comparing Popular Pet Grooming Hair Clipper Kits
With so many choices on the market, it can be hard to know which kit is best for your needs. Here’s a comparison of three popular options, highlighting what matters most for different pet owners.
| Brand/Model | Type | Noise Level | Battery Life | Best For | Price Range |
|---|---|---|---|---|---|
| Wahl Pro Series | Cordless | Low | Up to 2 hours | Home grooming, all coat types | $$ |
| Andis UltraEdge | Corded | Medium | N/A | Thick coats, professional use | $$$ |
| Oneisall Dog Clipper | Cordless | Very low | Up to 2.5 hours | Nervous pets, small to medium dogs | $ |
What really matters: Noise level is more important than most people think. Many pets are frightened by loud clippers. If your pet is nervous, choose a model known for quiet operation.
Credit: www.ebay.com
Frequently Asked Questions
How Often Should I Use Pet Grooming Hair Clippers On My Dog Or Cat?
The frequency depends on your pet’s breed, coat type, and your desired look. Short-haired breeds may only need a trim every 2-3 months, while long-haired or curly-coated pets might need a clip every 4-6 weeks. Always adjust based on how fast your pet’s hair grows and their comfort.
Can I Use Human Hair Clippers On My Pet?
No, it’s not recommended. Pet grooming clippers are designed for thicker fur and sensitive skin. Human clippers can overheat, pull hair, and may not cut efficiently, increasing the risk of injury.
What Should I Do If My Pet Is Scared Of The Clippers?
Take it slow. Let your pet sniff the clippers while turned off, then turn them on away from your pet to get used to the sound. Use treats and gentle praise. If your pet is very anxious, try a quieter model or seek help from a professional groomer.
How Do I Prevent Clipper Blades From Overheating?
Check the blade temperature every few minutes during grooming. If it feels hot, turn off the clippers and let them cool, or swap in a second blade. Regularly oiling the blades also helps reduce heat.
What’s The Best Way To Clean My Clippers After Use?
Remove as much fur as possible with the cleaning brush, then oil the blades. For deeper cleaning, soak the blades in blade wash or rubbing alcohol, scrub gently, and dry completely before storage. Always follow your kit’s specific instructions for best results.
Grooming your pet at home with a pet grooming hair clipper kit can save money and create a special bond. With the right tools, preparation, and a gentle approach, you’ll give your pet a safe, positive grooming experience every time.