Dog grooming is much more than just giving your pet a bath. It’s about maintaining their health, comfort, and appearance. For many breeds, especially those with thick or long coats, regular grooming is essential to prevent matting, overheating, and skin issues. One tool that often confuses both new and experienced dog owners is the thinning scissors. These specialized grooming shears look different from normal scissors, and their unique design raises many questions. Why do groomers use them? What benefits do they bring for your dog’s coat? And how can you use them safely at home?
If you want your dog to look neat, feel comfortable, and stay healthy, understanding thinning scissors is crucial. This article will explain what thinning scissors are, how they work, and why they’re such a valuable tool in dog grooming. You’ll also learn how to use them, which types to choose, and the common mistakes to avoid.
Whether you’re a pet owner hoping to groom at home or just curious about what happens at the salon, you’ll find clear answers and practical advice here.
What Are Thinning Scissors?
Thinning scissors are a type of grooming shear designed to remove only a portion of the hair with each cut. Unlike standard scissors, which have two straight blades that cut all the hair between them, thinning scissors have one or both blades featuring notched teeth. These teeth allow the scissors to snip some hairs while leaving others untouched. The result is a softer, more blended look rather than a harsh, straight line.
Most thinning scissors are made from stainless steel for durability and rust resistance. They come in various sizes and configurations, with the number of teeth per blade affecting the amount of hair removed. For example, scissors with more teeth remove less hair and create a finer finish, while those with fewer teeth take out more hair per cut.
Key features of thinning scissors:
- One or both blades have notched teeth
- Made from stainless steel or high-quality alloys
- Available in different sizes and tooth counts
- Designed to blend, thin, and texturize dog fur
The Main Uses Of Thinning Scissors In Dog Grooming
Thinning scissors are not just another tool in the groomer’s kit—they play a specific and important role in keeping your dog’s coat healthy and attractive. Here are the main ways professionals and knowledgeable pet owners use them:
1. Blending Different Coat Lengths
Dogs with layered or multi-length coats often show sharp lines after a haircut. Thinning scissors help blend these sections, making transitions from short to long hair look smooth and natural. This is especially important for breeds like Shih Tzus, Cocker Spaniels, and Golden Retrievers, where harsh lines can ruin the breed’s signature look.
2. Reducing Bulk In Thick Coats
Some dogs have very thick or dense fur, which can cause overheating and matting. Thinning scissors let groomers remove extra bulk without cutting the coat short. This keeps the dog cool and comfortable, while still maintaining the length and style of their fur.
3. Creating A Natural Appearance
Unlike regular scissors, which leave blunt edges, thinning scissors create a feathered, natural finish. This is ideal for show dogs, but also for any pet owner who wants their dog to look tidy without obvious signs of a recent trim.
4. Softening Harsh Or Choppy Lines
If you’ve ever cut your dog’s hair and noticed obvious lines or uneven patches, thinning scissors can fix these mistakes. They gently break up harsh edges, making the coat look more professional and less “home-cut. ”
5. Shaping Around Sensitive Areas
Thinning scissors are safer around delicate spots like the face, ears, and paws. Because they don’t cut every hair, there’s less risk of accidentally removing too much or creating sharp lines in these visible areas.
6. Managing Tangles And Matting
While not a replacement for dematting tools, thinning scissors can help work through mild tangles or mats by removing some of the bulk and making it easier to comb out problem areas.
Real-life example: Imagine your Golden Retriever has a thick mane around the neck and thinner fur on the legs. Using straight scissors would leave an obvious edge. Thinning scissors, however, gradually blend these sections, making your pet look naturally groomed.
Types Of Thinning Scissors And Their Differences
Not all thinning scissors are the same. The design and number of teeth affect how much hair is removed and what kind of result you get. Choosing the right type is essential for the best finish.
Single-sided Thinning Scissors
These have one notched blade and one straight blade. They’re the most common type and are useful for basic thinning and blending.
Double-sided Thinning Scissors
Both blades have teeth. These remove less hair per cut and are good for gentle blending and subtle texturizing.
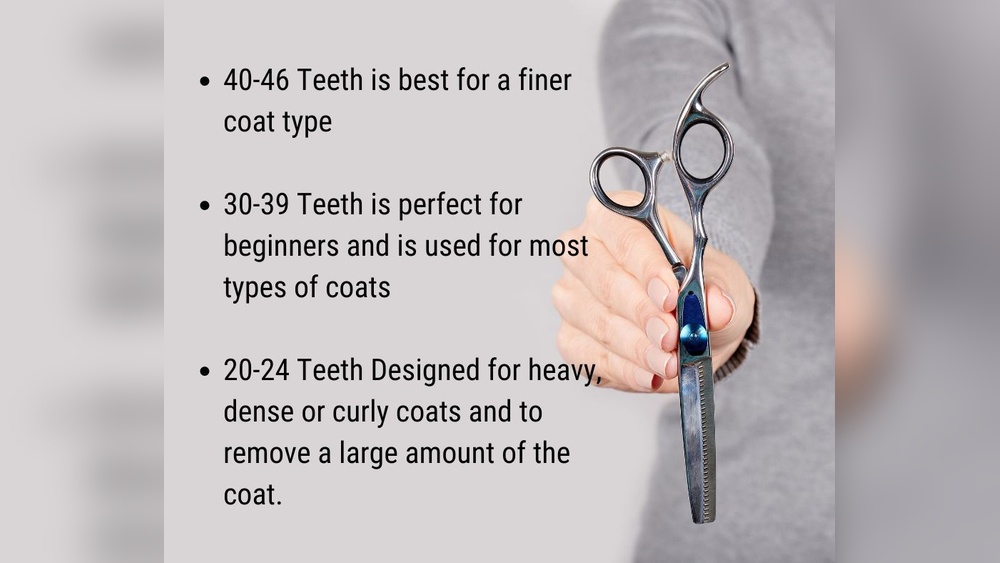
Chunkers
Chunkers have wider teeth, spaced further apart. They take out more hair and are used for removing heavy bulk or creating dramatic texture, especially in curly or thick-coated breeds.
Blenders
Blenders usually have more teeth (40–46) and are used for fine blending and finishing work. They create a very soft, smooth transition and are often used on the face or legs.
Here’s a comparison of common thinning scissors:
| Type | Teeth per Blade | Best For | Hair Removed (%) |
|---|---|---|---|
| Single-Sided | 24–46 | General thinning, blending | 30–50% |
| Double-Sided | 24–40 | Fine blending, finishing | 15–30% |
| Chunkers | 6–20 | Bulk removal, texture | 40–80% |
| Blenders | 40–46 | Subtle blending | 10–20% |
Pro tip: If you’re new to dog grooming, single-sided thinning scissors are the safest and easiest to start with.
Which Dogs Benefit Most From Thinning Scissors?
Not every breed or coat type needs thinning scissors, but many can benefit. Here are some situations where these shears are especially useful:
- Double-coated breeds: Golden Retrievers, German Shepherds, and Huskies often have thick undercoats that can overheat or mat.
- Curly or wavy coats: Poodles, Bichon Frises, and Labradoodles need regular thinning to prevent tight mats and keep the coat manageable.
- Long-haired breeds: Shih Tzus, Lhasa Apsos, and Afghan Hounds look best with blended, layered grooming.
- Mixed-breed dogs: Many mixed breeds have unpredictable coat types that need special thinning for a neat appearance.
Some breeds, such as the Yorkshire Terrier or Dachshund, have smooth, single-layer coats and rarely need thinning. For short-haired dogs, regular brushing is usually enough.

Credit: www.groomers-online.com
How To Use Thinning Scissors: Step-by-step Guide
Grooming your dog at home can be rewarding, but it takes practice and patience. Here’s a straightforward guide for using thinning scissors safely and effectively:
1. Prepare Your Dog
Start by giving your dog a thorough bath and dry. Clean, dry fur is much easier to cut and blend. Brush out any tangles or mats before you begin.
2. Choose The Right Scissors
Select the correct thinning scissors based on your dog’s coat and the area you’ll be working on. For most home grooming, single-sided shears with 30–40 teeth are ideal.
3. Hold The Scissors Correctly
Grip the scissors with your thumb and ring finger in the loops, using your index and middle fingers to guide and stabilize. This gives you more control and helps prevent accidents.
4. Start With Small Sections
Work on a small area at a time. Place the notched side of the scissors against the hair, about half an inch from the skin. Never cut too close—this can cause uneven spots or even nick the skin.
5. Cut And Comb
Snip gently, then comb through the section to remove loose hair and check your progress. Repeat as needed until you achieve the desired look.
6. Blend And Finish
Move to the next section, slightly overlapping with the previous one. This prevents lines and creates a seamless blend. Pay extra attention to visible areas like the face, legs, and tail.
7. Clean And Store Your Scissors
After grooming, wipe your scissors clean and store them in a dry place. Regular oiling and sharpening will keep them working smoothly.
Safety tip: Always keep your other hand on your dog to steady them and avoid sudden movements.
Common Mistakes To Avoid
Even experienced groomers can make errors with thinning scissors. Here are the most frequent mistakes and how to avoid them:
- Cutting too close to the skin: This can cause bald patches or even minor injuries. Always cut at least half an inch from the skin.
- Over-thinning one area: It’s easy to go overboard, especially when trying to fix uneven spots. Work slowly and check your progress often.
- Using the wrong scissors: Chunkers are not for fine blending, and blenders won’t handle thick mats. Match the tool to the job.
- Not brushing between cuts: Hair builds up quickly. Brushing after each snip prevents mistakes and helps you see the results.
- Skipping preparation: Dirty or matted fur will jam the scissors and lead to poor results.
Non-obvious insight: Thinning scissors should never be used as a replacement for regular brushing or proper coat care. They are a finishing tool, not a shortcut for neglected grooming.
Thinning Scissors Vs. Other Dog Grooming Tools
Dog grooming involves many different tools. It’s important to know how thinning scissors compare to others:
| Tool | Main Use | Effect on Coat | Best For |
|---|---|---|---|
| Thinning Scissors | Blending, thinning, texturizing | Natural, soft finish | Thick, layered, or curly coats |
| Straight Scissors | Cutting straight lines, shaping | Sharp, blunt edges | Outlines, paws, ears |
| Clippers | Shortening entire coat | Uniform, short finish | Short-haired or clipped breeds |
| Dematting Rake | Removing mats and tangles | Breaks up knots | Severely matted coats |
Key takeaway: Thinning scissors are not a replacement for straight scissors or clippers. They’re a finishing and blending tool, best used after the main cut.
Selecting The Right Thinning Scissors For Your Dog
With so many options available, choosing the right thinning scissors can be overwhelming. Here’s what really matters:
Material And Build Quality
Look for scissors made from stainless steel or high-quality alloys. Cheap materials dull quickly and may pull the hair instead of cutting smoothly.
Tooth Count And Design
More teeth mean a softer, more subtle effect, while fewer teeth remove more hair. For most home grooming, a middle range (around 30–40 teeth) is best.
Size And Weight
Smaller scissors (5–6 inches) are easier to control, especially for small dogs or sensitive areas. Larger shears cover more ground on big breeds but can be harder for beginners to handle.
Comfort And Grip
Ergonomic handles and finger rests make a big difference during long grooming sessions. Try to hold the scissors before buying if possible.
Safety Features
Rounded tips and smooth edges reduce the risk of accidental pokes or cuts.
Here’s a quick comparison of features to consider:
| Feature | Why It Matters | What to Look For |
|---|---|---|
| Material | Sharpness and durability | Stainless steel, quality alloys |
| Teeth Count | Amount of hair removed | 30–40 for most uses |
| Handle Design | Comfort and control | Ergonomic, with finger rest |
| Tip Style | Safety | Rounded or blunt tips |
| Blade Size | Suitability for dog size | 5–6” for small dogs, 7+” for large |
Non-obvious insight: Some professional-grade thinning scissors have adjustable tension screws, letting you fine-tune how tightly the blades close. This helps avoid hand fatigue and gives you more precision.
How Professional Groomers Use Thinning Scissors
Professional groomers rely on thinning scissors to create salon-quality finishes and solve tough coat problems. Here’s how they approach the job:
- Assessment: The groomer examines the dog’s coat, looking for areas that need blending, thinning, or softening.
- Layering: They use thinning scissors to layer the coat, especially where different types of fur meet (like the neck and body).
- Face and Feet: Thinning scissors are essential for shaping around the eyes, mouth, and paws without creating sharp lines.
- Final Touches: After the main haircut, pros use thinning scissors to “erase” scissor marks, blend transitions, and add texture.
Example: On a Poodle, the groomer might use clippers for the main body, straight scissors for the outline, and thinning scissors to blend the topknot into the ears seamlessly.
When Not To Use Thinning Scissors
Thinning scissors are versatile, but they’re not always the right tool. Here are situations where you should avoid them:
- Severely matted coats: Use a dematting tool or consult a professional. Thinning scissors can pull and hurt the dog.
- Very short or smooth coats: Breeds like Beagles or Boxers don’t benefit and may end up with patchy fur.
- Wet or dirty hair: Always work on clean, dry fur. Wet hair can clog the scissors and cause uneven results.
- Inexperienced users on show dogs: For competition grooming, improper use can ruin the dog’s look.
If you’re unsure, start conservatively or ask a professional for guidance.

Credit: www.clipit-grooming.com
Maintenance And Care For Thinning Scissors
Good tools last longer and perform better if you care for them. Here’s how to keep your thinning scissors in top shape:
Clean After Every Use
Wipe off hair and moisture with a soft cloth. Never store them wet, as this can cause rust.
Oil Regularly
A drop of scissor oil at the pivot keeps the movement smooth and prevents squeaking.
Sharpen When Needed
Dull scissors pull and tear fur instead of cutting. Have your thinning scissors professionally sharpened every 6–12 months, depending on use.
Store Safely
Keep scissors in a protective case or pouch. Avoid dropping them, as this can misalign the blades.
Pro tip: Never use your dog grooming scissors on anything but fur. Cutting paper, fabric, or other materials will dull them quickly.
Grooming Tips For Beginners
If you’re new to grooming your dog at home, here are some practical tips:
- Start slow: Practice on less visible areas before tackling the face or tail.
- Use good lighting: You’ll catch mistakes and see uneven spots more easily.
- Stay calm: Dogs pick up on your stress. Take breaks if either of you gets anxious.
- Reward your dog: Treats and praise make grooming a positive experience.
- Ask for help: If you’re unsure, watch online videos or consult a professional groomer. For more details, check the American Kennel Club’s grooming advice.

Credit: www.youtube.com
The Benefits Of Thinning Scissors For Your Dog
Using thinning scissors offers several health and comfort benefits for your pet:
- Reduces heat and matting: Removing bulk helps air reach the skin and prevents painful mats.
- Improves appearance: Blended coats look tidy and natural, not choppy.
- Less stress for your dog: Gentle, gradual cutting is less scary than loud clippers or big scissors.
- Prevents skin issues: Better air circulation means fewer hot spots and skin infections.
Frequently Asked Questions
What Is The Difference Between Thinning Scissors And Regular Scissors?
Thinning scissors have notched teeth and remove only some hairs with each cut, creating a blended, natural look. Regular scissors have straight blades and cut all the hair between them, leaving a sharp, blunt line.
Can I Use Thinning Scissors On Any Dog Breed?
Not all breeds benefit from thinning scissors. They’re best for dogs with thick, curly, or layered coats. Short-haired or smooth-coated breeds usually do not need them.
How Often Should I Use Thinning Scissors On My Dog?
It depends on your dog’s coat and how quickly it grows. Most dogs benefit from thinning every 4–8 weeks, or as part of their regular grooming schedule.
Are Thinning Scissors Safe For Beginners To Use?
Yes, thinning scissors are generally safer than straight scissors because they remove less hair per cut and are less likely to cause sharp lines or bald spots. However, you should still use caution and practice on less visible areas first.
What Should I Do If My Scissors Become Dull Or Hard To Use?
Clean and oil your scissors regularly. If they’re still not cutting well, have them professionally sharpened. Never try to sharpen thinning scissors at home, as this can damage the teeth.
Dog grooming is both an art and a science, and the right tools make all the difference. Thinning scissors are a powerful addition to any grooming kit, whether you’re a professional or a caring pet owner. By understanding how and when to use them, you’ll keep your dog looking and feeling their best.
With patience, practice, and the right approach, thinning scissors help you achieve a salon-quality finish and make grooming a positive experience for your four-legged friend.